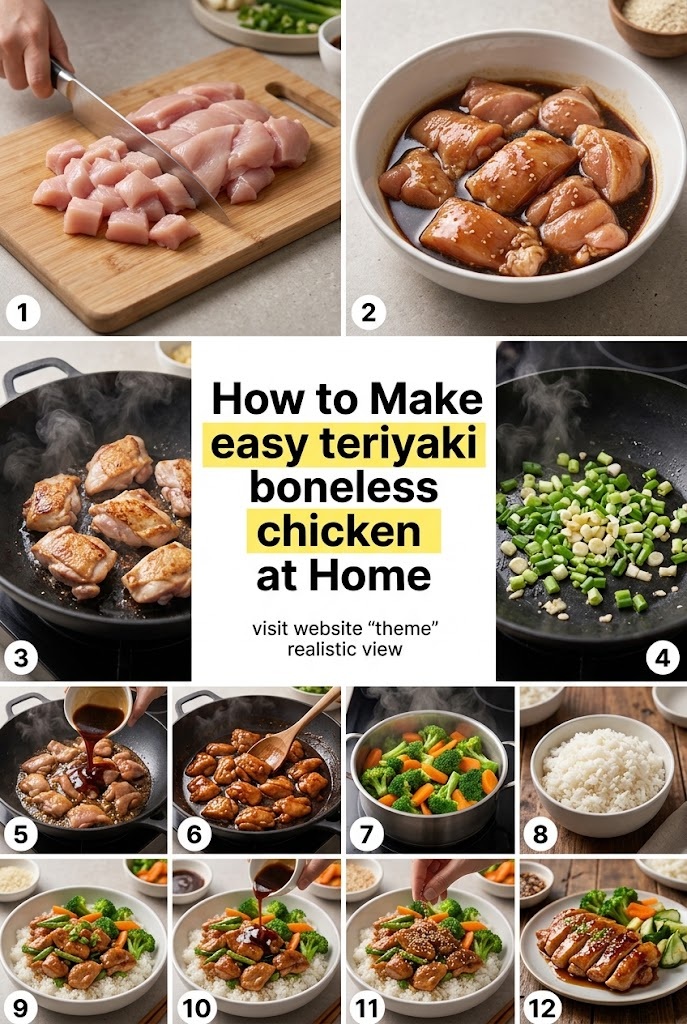
How to Make easy teriyaki boneless chicken at Home
There is a specific, intoxicating aroma that wafts through the air of a busy kitchen when soy sauce, ginger, and sugar meet a hot pan. It is the scent of Teriyaki—a flavor profile that has conquered the world, from the street stalls of Tokyo to the bustling teriyaki shops of Seattle and the dinner tables of suburban America.
While “takeout” is often the default solution for a Teriyaki craving, there is a profound secret every home cook should know: making Teriyaki boneless chicken at home is not only incredibly easy, but the results are exponentially better than anything you can get in a plastic container. By controlling the ingredients, you balance the salt, the sweetness, and the “umami” to your exact preference.
In this comprehensive guide, we will dive deep into the art of the perfect Teriyaki chicken. We will cover the science of the sauce, the best cuts of meat, various cooking methods, and the secrets to achieving that signature glossy glaze that clings perfectly to every bite.
Understanding the Essence of Teriyaki
The word Teriyaki is derived from two Japanese words: teri, meaning luster or glaze, and yaki, meaning grilled or broiled. Traditionally, it refers to a cooking technique where foods are glazed with a mixture of soy sauce, mirin, and sugar while being cooked.
In Western kitchens, we often think of Teriyaki as a “sauce,” but it is truly a method of transformation. The goal is to create a syrupy reduction that coats the protein, providing a contrast between the savory interior of the chicken and the sweet-savory exterior.
Why Boneless Chicken?
While bone-in chicken has its merits, boneless chicken is the gold standard for a quick, easy weeknight Teriyaki. It cooks faster, absorbs the marinade more efficiently, and is much easier to eat, especially when served over a bowl of steaming rice.
The Components: What You Will Need
To create a world-class Teriyaki dish, you don’t need a pantry full of exotic ingredients. You need high-quality staples.
1. The Protein: Thighs vs. Breasts
- Boneless, Skinless Chicken Thighs: This is the preferred choice for most chefs. Thigh meat has a higher fat content, which means it remains juicy and tender even under high heat. It also has a more robust “chicken” flavor that stands up well to the strong flavors of the sauce.
- Boneless, Skinless Chicken Breasts: If you prefer a leaner option, breasts work well. However, they are prone to drying out. To prevent this, breasts should be sliced thinly and cooked rapidly.
2. The Holy Trinity of Teriyaki Sauce
A classic, authentic Teriyaki sauce relies on three primary pillars:
- Soy Sauce: This provides the salt and the deep umami base. For the best results, use a high-quality brewed soy sauce (like Kikkoman). If you are watching your sodium, “Less Sodium” versions work perfectly fine here.
- Sweetener: Traditionally, this is a combination of Sugar and Mirin (a Japanese sweet rice wine). The sugar provides the sweetness, while the mirin adds a unique acidity and a beautiful shine to the final glaze.
- Aromatics: Fresh Ginger and Garlic are non-negotiable. They provide the “zing” and the depth that distinguishes a homemade sauce from a bottled one.
3. The “Secret” Ingredients for Extra Oomph
- Rice Vinegar: A splash of acidity helps cut through the sugar and brightens the dish.
- Sesame Oil: Just a teaspoon adds a toasted, nutty aroma that completes the flavor profile.
- Cornstarch Slurry: While traditional Japanese Teriyaki reduces through simmering, most home cooks prefer a slightly thicker sauce. A mix of cornstarch and water ensures the sauce “hugs” the chicken.
Step-by-Step: The Master Easy Teriyaki Chicken Recipe
This recipe is designed for maximum flavor with minimum effort. It takes roughly 20-30 minutes from start to finish.
Ingredients List
- Chicken: 1.5 lbs boneless skinless chicken thighs, cut into 1-inch bite-sized pieces.
- Soy Sauce: 1/2 cup.
- Water: 1/4 cup.
- Brown Sugar: 1/4 cup (packed).
- Honey: 1 tablespoon (adds a different dimension of sweetness and stickiness).
- Fresh Ginger: 1 tablespoon, grated or finely minced.
- Fresh Garlic: 3 cloves, minced.
- Rice Vinegar: 1 tablespoon.
- Sesame Oil: 1 teaspoon.
- Cornstarch Slurry: 1 tablespoon cornstarch mixed with 1 tablespoon cold water.
- Garnish: Toasted sesame seeds and sliced green onions.
Instructions
Phase 1: Preparing the Sauce
In a medium bowl, whisk together the soy sauce, water, brown sugar, honey, ginger, garlic, rice vinegar, and sesame oil. Ensure the sugar is mostly dissolved.
Pro Tip: If you have time, let this sauce sit for 10 minutes to allow the garlic and ginger oils to infuse into the liquid.
Phase 2: Searing the Chicken
- Heat a large skillet or wok over medium-high heat with a tablespoon of neutral oil (like canola or vegetable oil).
- Add the chicken pieces in a single layer. Do not crowd the pan; if necessary, cook in two batches.
- Let the chicken sear undisturbed for 3-4 minutes until a golden-brown crust forms.
- Flip the pieces and cook for another 3 minutes until the chicken is nearly cooked through.
Phase 3: The Glazing Process
- Pour the prepared Teriyaki sauce directly into the skillet with the chicken.
- Bring the liquid to a simmer. The sauce will begin to bubble and interact with the fats from the chicken.
- Whisk your cornstarch slurry one last time and pour it into the bubbling sauce.
- Stir constantly. Within 1-2 minutes, you will see the sauce transform from a thin liquid into a thick, dark, and glossy glaze.
- Once the sauce coats the back of a spoon and the chicken is fully cooked (internal temp of 165°F), remove from heat.
Phase 4: Serving
Serve the chicken immediately over a bed of fluffy white jasmine rice or brown rice. Spoon extra sauce from the pan over the top. Garnish generously with sesame seeds and green onions.
Advanced Techniques: Achieving Perfection
While the basic recipe is fantastic, mastering Teriyaki involves understanding a few culinary nuances.
The Importance of the Sear
The “Maillard Reaction” is a chemical reaction between amino acids and reducing sugars that gives browned food its distinctive flavor. When you sear the chicken before adding the sauce, you are creating a foundation of flavor that the sauce alone cannot provide. If you simply boil the chicken in the sauce, it will be tender, but it will lack the complexity of seared meat.
Achieving the “Mirror” Glaze
A great Teriyaki chicken should literally shine. This luster comes from two things: sugar and emulsified fats. If your sauce looks dull, it might need a bit more honey or a tiny pat of cold butter swirled in at the very end. The butter trick is a restaurant secret that adds a velvety texture and a brilliant sheen.
Balancing the Flavors
Taste your sauce before adding it to the pan.
- Too salty? Add a tablespoon of water or a bit more sugar.
- Too sweet? Add a teaspoon of rice vinegar or a squeeze of lime juice.
- Too bland? More ginger. Always more ginger.
Alternative Cooking Methods
The skillet method is the fastest, but depending on your kitchen setup, you might prefer these variations:
1. The Oven-Baked Method (Sheet Pan Teriyaki)
This is perfect for feeding a crowd without standing over the stove.
- Toss the chicken pieces and some sturdy vegetables (like broccoli and bell peppers) in half of the Teriyaki sauce.
- Spread them on a parchment-lined baking sheet.
- Bake at 400°F (200°C) for 15-20 minutes.
- In the last 5 minutes, brush on the remaining sauce (thickened on the stove) to create a thick crust.
2. The Air Fryer Method
The air fryer is incredible for getting crispy edges on boneless chicken.
- Marinate the chicken in a small amount of the sauce for 15 minutes.
- Air fry at 380°F for 12-15 minutes, shaking the basket halfway through.
- Toss the crispy chicken in the thickened sauce in a separate bowl just before serving.
3. The Slow Cooker Method
For a “set it and forget it” meal:
- Place whole boneless thighs in the slow cooker.
- Pour the sauce (minus the cornstarch) over them.
- Cook on LOW for 4-5 hours.
- Remove the chicken, shred or chop it, and thicken the leftover liquid on the stove with a slurry before recombining.
Selecting the Right Side Dishes
Teriyaki chicken is a strong, dominant flavor. It needs sides that can either soak up the sauce or provide a refreshing contrast.
The Grains
- Jasmine Rice: The floral aroma and sticky texture make it the ideal companion.
- Brown Rice: For a nuttier flavor and more fiber.
- Quinoa: A modern, protein-packed alternative that holds the sauce surprisingly well.
- Fried Rice: If you have leftover rice, a quick ginger-garlic fried rice takes the meal to the next level.
The Vegetables
- Steamed Broccoli: The florets act like little sponges for the Teriyaki glaze.
- Bok Choy: Quickly sautéed with garlic, it provides a crisp, watery crunch.
- Pickled Cucumbers (Sunomono): The vinegar-heavy crunch of Japanese pickles provides the perfect palate cleanser between bites of rich chicken.
Healthier Variations and Dietary Adjustments
Teriyaki is generally a crowd-pleaser, but the traditional recipe is high in sugar and sodium. Here is how to adapt it:
Low-Sodium Teriyaki
- Use “Low Sodium” or “Lite” soy sauce.
- Increase the amount of ginger, garlic, and vinegar to compensate for the reduced salt. The aromatics will provide the “hit” your taste buds are looking for.
Gluten-Free Teriyaki
Standard soy sauce contains wheat. To make this gluten-free:
- Substitute soy sauce with Tamari (which is naturally gluten-free).
- Alternatively, use Coconut Aminos, which is soy-free and gluten-free (though slightly sweeter, so reduce the added sugar).
Sugar-Free/Keto Teriyaki
- Replace brown sugar and honey with a sugar-free substitute like Monkfruit sweetener or Allulose.
- Omit the cornstarch slurry and instead let the sauce reduce naturally by simmering for longer, or use a tiny pinch of xanthan gum to thicken.
Meal Prepping Teriyaki Chicken
Teriyaki chicken is one of the best “meal prep” foods in existence. Unlike some dishes that degrade in the fridge, the flavors of Teriyaki often deepen overnight.
Storage
Store the cooked chicken and sauce in an airtight container in the refrigerator for up to 4 days.
Freezing
You can freeze cooked Teriyaki chicken for up to 3 months. However, for the best quality, freeze the raw chicken in the marinade. When you thaw it, the chicken will have been marinating the entire time, resulting in incredibly tender meat.
Reheating
To keep the chicken from becoming rubbery:
- Microwave: Cover with a damp paper towel and heat in 30-second intervals.
- Stovetop: Reheat in a skillet with a splash of water or chicken broth to loosen the sauce and keep the meat moist.
Troubleshooting Common Issues
“My sauce is too thin.”
This usually happens if the cornstarch slurry wasn’t mixed correctly or if the sauce didn’t reach a full boil. Ensure the sauce reaches a bubbling state; cornstarch only activates and thickens at high temperatures.
“The chicken is tough.”
This is common with chicken breasts. If using breasts, try “velveting” the meat. This involves tossing the raw slices in a bit of cornstarch and oil before searing. It creates a protective barrier that keeps the juices inside. If using thighs, you may have just overcooked them; remember they continue to cook for a minute after being pulled from the heat.
“The sauce tastes burnt.”
Teriyaki sauce has a high sugar content. If your pan is too hot, the sugar will move past caramelization and into burning very quickly. If you see the sauce turning black and smelling acrid, turn down the heat immediately and add a splash of water to stop the cooking process.
The History: From Japan to the World
To truly appreciate Teriyaki, it helps to understand its journey. While the technique is Japanese, the sauce we know and love in the United States has a very “Aloha” history.
In the 1960s, Japanese immigrants in Hawaii began adapting traditional recipes using local ingredients. They didn’t always have access to traditional mirin, so they used pineapple juice as a sweetener and acidity agent. This “Hawaiian Teriyaki” is the ancestor of the modern American version—sweeter, thicker, and more garlic-forward than the original Japanese glaze.
In the 1970s and 80s, the city of Seattle became the “Teriyaki Capital” of the US. Thousands of small, family-owned shops opened, offering charred, glazed chicken with a side of rice and iceberg lettuce salad with a creamy dressing. This “Seattle Style” is what most Americans think of when they crave Teriyaki, and it is the style we have replicated in the recipe above.
Pro-Tips for the Best Home Experience
- Grate your own ginger: Do not use the powdered stuff in a jar. The fresh, spicy bite of real ginger root is the soul of this dish. You can keep a knob of ginger in the freezer and grate it while frozen—it’s much easier!
- Use a Cast Iron Skillet: If you have one, use it. The heat retention of cast iron creates the best sear on the chicken, mimicking the high heat of a commercial wok or grill.
- Don’t skip the Sesame Oil: It might seem like a small addition, but that one teaspoon provides the “restaurant smell” that makes the dish feel authentic.
- Rest the Meat: Even though it’s in bite-sized pieces, let the chicken sit in the sauce for 2 minutes after turning off the heat. This allows the fibers to relax and soak up the glaze.
Frequently Asked Questions
Can I use honey instead of brown sugar?
Absolutely. Honey provides a more floral sweetness and a very sticky texture. You can use a 1:1 ratio.
Is Teriyaki sauce the same as Stir-fry sauce?
Not exactly. Stir-fry sauce is usually thinner and more savory, often containing oyster sauce or chicken broth. Teriyaki is specifically a sugar-and-soy-based glaze.
Can I make this with other proteins?
Yes! This exact sauce and method work perfectly for:
- Salmon: Brush the glaze on during the last 3 minutes of baking.
- Beef: Use thinly sliced flank steak or sirloin.
- Tofu: Use extra-firm tofu, press out the water, and sear until crispy before adding the sauce.
- Shrimp: Shrimp cook very fast, so add the sauce almost immediately after the shrimp hit the pan.
What is the best way to mince garlic for this?
A garlic press is fine, but for the best flavor, use a microplane or finely mince it with a knife until it’s almost a paste. This ensures the garlic flavor is distributed evenly throughout the sauce rather than getting bitter chunks.
Conclusion: The Joy of the Homemade Glaze
Making easy Teriyaki boneless chicken at home is more than just a way to save money on takeout; it’s a way to bring a classic, comforting culinary tradition into your own kitchen. There is a profound satisfaction in watching a thin, brown liquid transform into a shimmering, mahogany glaze that perfectly coats a piece of tender chicken.
By following this guide, you have moved beyond a simple recipe and into the realm of technique. You understand the balance of flavors, the importance of the sear, and the versatility of the ingredients. Whether you are cooking a quick Monday night dinner for the family or meal prepping for a busy week ahead, this Teriyaki chicken will surely become a permanent fixture in your culinary repertoire.
Gather your soy sauce, ginger, and garlic. Turn up the heat. And enjoy the best Teriyaki chicken you’ve ever had—made right in your own home.
Quick Reference Recipe Summary
- Prep time: 10 mins
- Cook time: 15 mins
- Total time: 25 mins
- Servings: 4
- Key Ingredients: Chicken thighs, Soy Sauce, Brown Sugar, Ginger, Garlic, Cornstarch.
- Best Side: Steamed Jasmine Rice.
Happy Cooking!