How to Make meal-prep creamy garlic boneless chicken at Home
In the fast-paced world of modern living, the dinner dilemma is a universal struggle. We all want a meal that tastes like it came from a high-end bistro, but we often only have the energy for a bowl of cereal by the time Wednesday rolls around. This is where the magic of meal prepping enters the frame, and specifically, where the Creamy Garlic Boneless Chicken becomes your new best friend.
This isn’t just another chicken recipe; it is a versatile, high-protein, incredibly flavorful foundation for your entire week. Whether you are a fitness enthusiast tracking macros, a busy parent trying to feed a family, or a professional looking to save money on expensive lunches, mastering this dish will change your relationship with your kitchen.
In this comprehensive guide, we will dive deep into the science of the perfect sear, the secrets of a velvet-smooth garlic sauce, and the logistical mastery required to keep your meal prep tasting fresh until Friday.
Why Creamy Garlic Chicken is the King of Meal Prep
Before we get into the “how,” let’s talk about the “why.” Meal prepping often gets a bad reputation for being dry, bland, or repetitive. Creamy Garlic Chicken defies all these stereotypes for several reasons:
- Moisture Retention: The creamy sauce acts as a protective barrier. Unlike plain grilled chicken which can become “woody” and dry when reheated in a microwave, the fats and liquids in a garlic cream sauce keep the meat tender.
- Flavor Depth: Garlic is a powerhouse ingredient. As it sits in the fridge, the flavors actually meld and intensify, making the leftovers taste even better than the initial meal.
- Versatility: You can pair this chicken with pasta, rice, zoodles, steamed broccoli, or roasted potatoes. One batch of chicken can lead to four different-tasting meals.
- Cost-Effective: Buying boneless chicken in bulk and using pantry staples like garlic, flour, and cream is significantly cheaper than buying pre-packaged “healthy” meals.
Choosing Your Foundation: Breasts vs. Thighs
The first decision you must make is the cut of meat. For a creamy garlic preparation, both boneless skinless chicken breasts and boneless skinless chicken thighs have their merits.
The Case for Chicken Breasts
Chicken breasts are the go-to for those looking to keep fat and calories lower. They are high in protein and provide a “clean” palate for the garlic sauce. To prevent them from drying out, it is essential to pound them to an even thickness or butterfly them so they cook quickly and evenly.
The Case for Chicken Thighs
If you are new to meal prepping, chicken thighs are much more forgiving. They have a higher fat content, which means they stay incredibly juicy even after being reheated multiple times. They also possess a richer flavor that stands up well to heavy garlic and cream.
The Essential Toolkit for Meal Prep Success
To execute this recipe at a professional level, you need the right tools. You don’t need a five-star kitchen, but these basics will make a difference:
- A Large Heavy-Bottomed Skillet: Cast iron or stainless steel is preferred for getting that golden-brown sear. Non-stick is fine, but you won’t get the same “fond” (the brown bits at the bottom of the pan) which is the secret to a great sauce.
- A Sharp Chef’s Knife: Clean cuts mean even cooking.
- Meat Thermometer: The only way to ensure chicken is safe (165°F) without overcooking it into a rubbery mess.
- Airtight Containers: Glass containers are superior for reheating as they don’t leach chemicals and they keep the sauce from staining.
- Garlic Press: While hand-mincing is great, a press releases more of the oils, giving you a more intense garlic punch.
Ingredient Deep Dive: What Makes a Great Sauce?
The difference between a mediocre sauce and a restaurant-quality sauce lies in the quality of your ingredients.
The Garlic
Do not use the pre-minced garlic that comes in a jar of water. It lacks the pungent, spicy, and sweet notes of fresh garlic. For this recipe, you want fresh bulbs. Look for cloves that are firm and haven’t started to sprout green centers.
The Cream Base
- Heavy Cream: Provides the most luxurious texture and won’t curdle when simmered.
- Half-and-Half: A lighter option, but you may need a thickener like cornstarch to achieve the right consistency.
- Coconut Milk (Full Fat): A great dairy-free alternative that pairs surprisingly well with garlic, though it will add a slight tropical undertone.
The Aromatics and Seasonings
- Shallots: More delicate than onions, they provide a sophisticated sweetness.
- Chicken Broth/Stock: Use low-sodium so you can control the salt levels yourself.
- Parmesan Cheese: Freshly grated (not the stuff in a green shaker) adds saltiness and helps thicken the sauce.
- Herbs: Fresh parsley, thyme, or oregano add a pop of color and earthiness.
Step-by-Step Instructions: The Master Recipe
Phase 1: Preparation and Searing
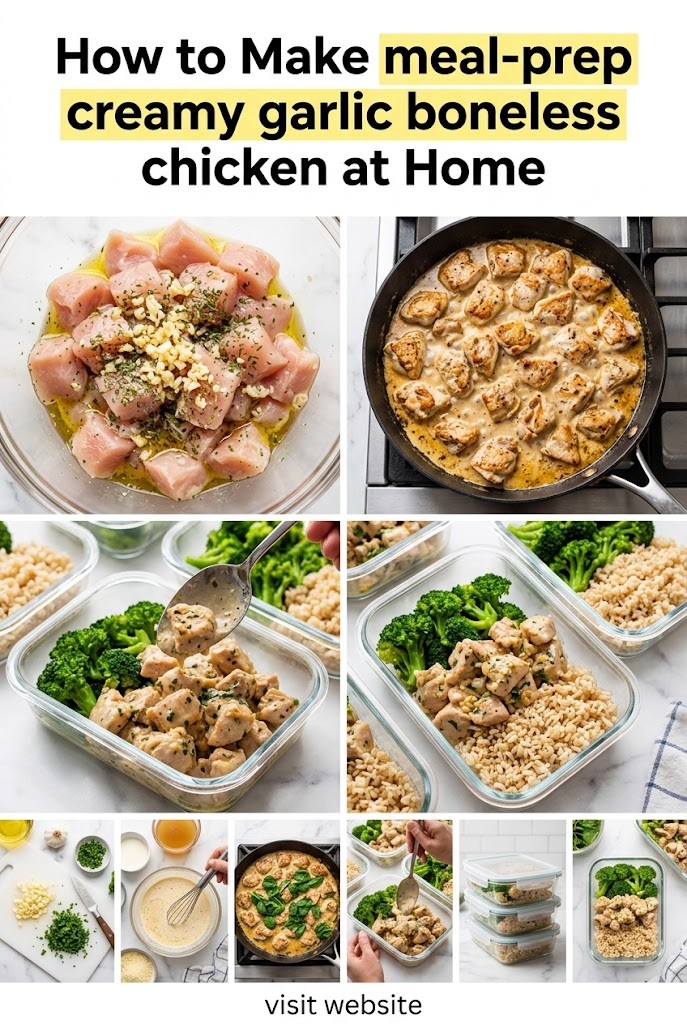
- Prep the Chicken: Pat your boneless chicken dry with paper towels. This is the most important step for a good sear. Season generously with salt, black pepper, and a hint of onion powder.
- Dredge (Optional): Lightly coat the chicken in a thin layer of flour. This helps create a golden crust and naturally thickens the sauce later.
- The Sear: Heat olive oil and a tablespoon of butter in your skillet over medium-high heat. Place the chicken in the pan—do not crowd it. Work in batches if necessary.
- The Goal: Cook for 5–7 minutes per side until golden brown. Remove the chicken from the pan and set it aside on a plate. It doesn’t need to be 100% cooked through yet; it will finish in the sauce.
Phase 2: Building the Garlic Sauce
- Sauté Aromatics: Lower the heat to medium. In the same pan (don’t wash out those brown bits!), add a bit more butter. Toss in your minced garlic (at least 5–6 cloves) and finely diced shallots. Sauté for 1–2 minutes until fragrant but not burnt. Burnt garlic is bitter and will ruin the dish.
- Deglaze: Pour in half a cup of chicken broth or a splash of dry white wine (like Sauvignon Blanc). Use a wooden spoon to scrape the bottom of the pan to release the fond.
- Simmer: Add your heavy cream and bring to a gentle simmer. Let it bubble for 3–5 minutes until it begins to reduce and thicken.
- Flavor Bomb: Stir in freshly grated Parmesan cheese, a squeeze of lemon juice (to cut through the richness), and your fresh herbs.
Phase 3: The Reunion
- Combine: Place the chicken and any juices that collected on the plate back into the skillet.
- Baste: Spoon the sauce over the chicken and let it simmer for another 3–4 minutes until the chicken reaches an internal temperature of 165°F.
Strategic Meal Prepping: Portioning and Storage
Once the cooking is done, the “prep” part begins. How you handle the chicken now determines how it will taste on Thursday afternoon.
Cooling is Key
Never put steaming hot food directly into the refrigerator. This creates condensation inside the container, which turns your beautiful creamy sauce into a watery mess and can make the chicken slimy. Let the chicken sit at room temperature for about 20 minutes before sealing.
Portions
If you are prepping for the week, divide the chicken and sauce into equal portions.
- Pro Tip: If you are serving this with a grain (like rice or quinoa), put the grain on the bottom. The rice will soak up any excess garlic sauce, making it incredibly flavorful.
- Separation: If you prefer your vegetables to stay crisp, use containers with dividers to keep the creamy chicken away from your salad or steamed greens.
Reheating for Best Results
The microwave is the enemy of cream sauces if used incorrectly.
- Low and Slow: Reheat at 50% power in 1-minute intervals. This prevents the cream from “splitting” (where the fat separates from the liquid).
- The Splash Method: If the sauce looks too thick after being in the fridge, add a teaspoon of water or milk before reheating to loosen it up.
Creative Variations to Keep it Interesting
Eating the exact same meal five days in a row can lead to “prep burnout.” Here is how to vary the Creamy Garlic Chicken template:
1. The Tuscan Twist
Add sun-dried tomatoes and chopped spinach to the sauce during the simmering phase. The acidity of the tomatoes balances the garlic perfectly.
2. The Spicy Kick
Add red pepper flakes to the butter when sautéing the garlic. You can also add a teaspoon of Dijon mustard to the cream for a tangy, sharp finish.
3. The Mushroom Forest
Sauté sliced cremini or shiitake mushrooms in the pan before adding the garlic. The earthiness of the mushrooms transforms the dish into a hearty “Chicken Marsala” style meal without the wine.
4. The Keto/Low-Carb Version
This recipe is naturally keto-friendly, but ensure you skip the flour dredging. Serve it over a bed of “zoodles” (zucchini noodles) or mashed cauliflower.
Pairing Guide: What to Serve with Your Prep
To make your meal prep a complete nutritional profile, you need the right sides.
- Complex Carbs: Roasted sweet potatoes, brown rice, or whole-wheat pasta. These provide sustained energy throughout the day.
- Green Power: Steamed asparagus, sautéed kale, or roasted Brussels sprouts. The bitterness of these greens contrasts beautifully with the rich garlic sauce.
- Light and Fresh: A simple arugula salad with a lemon vinaigrette can be packed on the side to provide a fresh crunch that cuts through the creaminess.
Troubleshooting Common Issues
Even the best cooks run into trouble. Here is how to fix common Creamy Garlic Chicken mishaps:
“My sauce is too thin!”
Mix a teaspoon of cornstarch with a tablespoon of cold water to create a “slurry.” Stir it into the simmering sauce. It will thicken almost instantly. Alternatively, add more Parmesan cheese.
“My sauce curdled!”
This usually happens if the heat is too high or if you used an acidic ingredient (like too much lemon juice) too early. To fix, remove from heat and whisk in a tablespoon of heavy cream very quickly.
“The chicken is tough.”
This is usually a result of overcooking. Next time, use a meat thermometer and pull the chicken off the heat at 160°F; the “carryover cooking” will bring it to the safe 165°F while it rests.
The Nutritional Powerhouse
When you make this at home, you control the nutrition. A standard portion of this Creamy Garlic Boneless Chicken (approx. 6oz chicken + sauce) typically contains:
- Calories: 350–450 (depending on cream usage)
- Protein: 35–42g
- Fats: 20–25g
- Carbs: 5–10g
By choosing lean breasts and light cream, you can drop the fat content significantly, making it an ideal post-workout meal. By using thighs and heavy cream, it becomes a perfect high-fat fuel for those on a ketogenic diet.
Final Thoughts on Mastering the Prep
Mastering Meal-Prep Creamy Garlic Boneless Chicken is a gateway to a more organized, delicious, and healthy life. It removes the stress of daily cooking while ensuring you aren’t sacrificing flavor for convenience.
The secret isn’t just in the recipe—it’s in the process. It’s about the sizzle of the pan, the aroma of the garlic filling your kitchen on a Sunday afternoon, and the satisfaction of opening your fridge on a Tuesday night to find a gourmet meal waiting for you.
Invest the time to learn the techniques of searing and sauce-making, and you’ll find that “meal prep” is no longer a chore, but the highlight of your culinary week. Grab your apron, peel your garlic, and get ready to elevate your lunch game forever.