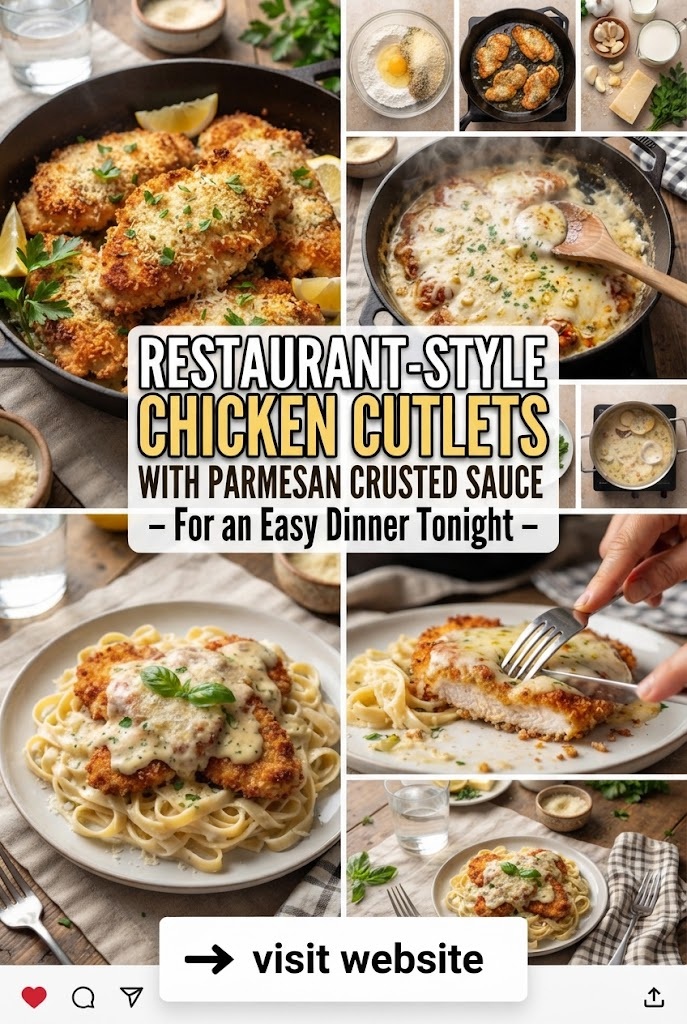
Restaurant-Style Chicken Cutlets with Parmesan Crusted Sauce – For an Easy Dinner Tonight
There is a specific kind of magic that happens in a high-end Italian bistro when a plate of golden-brown chicken cutlets is placed on the table. The crust is impossibly crisp, the meat inside is succulent and steaming, and the sauce—that velvety, rich, Parmesan-infused nectar—ties everything together in a symphony of savory excellence.
For many home cooks, replicating this “restaurant quality” at home feels like a daunting task. How do they get the breading so even? How does the sauce remain creamy without breaking? How is the chicken so tender you could almost cut it with a fork?
Tonight, the mystery ends. This is the definitive guide to creating Restaurant-Style Chicken Cutlets with Parmesan Crusted Sauce. Whether you are looking for an easy dinner to pivot away from a stressful workday or a centerpiece dish for a weekend dinner party, this recipe is your roadmap to culinary success.
The Philosophy of the Perfect Cutlet
Before we pick up a knife, we must understand what makes a cutlet superior. A chicken cutlet isn’t just a fried piece of meat; it is a study in textures. You are looking for a “tri-layer” experience:
- The Exterior: A shattering, golden-brown crust seasoned to perfection.
- The Interface: A thin layer where the breading meets the meat, which should be flavorful and well-adhered (no “blowouts” or peeling breading).
- The Interior: Moist, juicy chicken that has been cooked quickly at high heat to retain its natural juices.
To achieve this, we focus on technique: the thickness of the meat, the temperature of the oil, and the quality of the cheese.
Selecting the Right Ingredients
You cannot produce a five-star meal with one-star ingredients. Here is what you need to look for when shopping for this dish.
The Chicken
Look for “Air-Chilled” chicken breasts. Most commercial chicken is chilled in water baths, which adds water weight and can lead to a “spongy” texture. Air-chilled chicken has a more concentrated flavor and roasts/fries much better. If you can’t find pre-sliced cutlets, buy whole breasts and we will butterfly them ourselves.
The Cheese: Parmigiano-Reggiano vs. The Shaker Bottle
For the Parmesan Crusted Sauce, the cheese is the star. Avoid the pre-shredded stuff in bags or the “dust” in the green cans. These often contain cellulose (wood pulp) to prevent clumping, which prevents the cheese from melting into a smooth sauce. Buy a wedge of authentic Parmigiano-Reggiano or a high-quality domestic Parmesan and grate it yourself using a microplane or the fine side of a box grater.
The Breadcrumbs
For that distinct restaurant crunch, we use a hybrid approach. Plain breadcrumbs provide total coverage, while Panko (Japanese-style breadcrumbs) provides the airy, jagged peaks that catch the sauce. Mixing the two creates the perfect textural profile.
Part 1: The Foundation – Prepping the Chicken
The biggest mistake home cooks make is frying uneven pieces of chicken. A breast is naturally thick at one end and tapered at the other. If you fry it as-is, the thin end will be dry by the time the thick end is safe to eat.
Step 1: Butterflying and Pounding
Place your chicken breast flat on a cutting board. With your hand flat on top of the breast, carefully slice through the middle horizontally to create two thin halves.
Next, place these pieces between two sheets of plastic wrap or inside a heavy-duty gallon freezer bag. Using the flat side of a meat mallet (or the bottom of a heavy skillet), gently pound the chicken from the center outward. Your goal is a uniform thickness of about 1/4 inch. This ensures that every square inch of the chicken cooks at the exact same rate.
Step 2: The “Dry Brine”
Once pounded, season the chicken liberally with Kosher salt and black pepper on both sides. If you have time, let the seasoned chicken sit in the fridge for 30 minutes. This allows the salt to penetrate the fibers, ensuring the meat is seasoned all the way through, not just on the surface.
Part 2: The Three-Station Dredging System
Standard breading procedure is a culinary law for a reason. It creates a chemical bond between the meat and the crust.
Station 1: The Flour
Use all-purpose flour seasoned with a pinch of salt and garlic powder. This acts as a “primer,” drying the surface of the chicken so the egg has something to grip.
Station 2: The Egg Wash
Whisk together two large eggs with a tablespoon of heavy cream or water. The fat in the cream helps the egg coat the chicken more thickly, creating a better “glue” for the crumbs.
Station 3: The Breading
This is where the flavor lives. Combine:
- 1 cup Panko breadcrumbs
- 1/2 cup fine Italian breadcrumbs
- 1/2 cup freshly grated Parmesan cheese
- 1 teaspoon dried oregano
- 1/2 teaspoon smoked paprika (for color)
- Freshly cracked black pepper
Pro Tip: When breading, use the “Dry Hand/Wet Hand” method. Use your left hand for the dry flour and breadcrumbs, and your right hand for the egg wash. This prevents your fingers from becoming “breaded” along with the chicken.
Part 3: The Mastery of Frying
To get that restaurant-style golden hue, the oil type and temperature are non-negotiable.
The Oil Choice
Do not use extra virgin olive oil for frying; its smoke point is too low, and it will turn bitter. Instead, use a neutral oil with a high smoke point like Avocado oil, Grapeseed oil, or Canola oil. For a truly decadent flavor, add a tablespoon of unsalted butter to the oil once it’s hot—the butter solids will brown and add a nutty aroma to the crust.
The Temperature
You are looking for 350°F (175°C). If you don’t have a kitchen thermometer, dip the end of a wooden spoon into the oil. If it bubbles steadily around the wood, the oil is ready.
The Technique
Lay the chicken into the pan away from you to avoid oil splatters. Do not crowd the pan! If you put too many pieces in at once, the oil temperature will drop, and the chicken will absorb the grease instead of searing, resulting in a soggy cutlet.
Fry for 3–4 minutes per side until deeply golden. Transfer the finished cutlets to a wire cooling rack set over a baking sheet. Never put fried chicken directly onto a paper towel or a flat plate; the steam trapped underneath will turn the bottom crust soft in seconds.
Part 4: The Showstopper – Parmesan Crusted Sauce
While the chicken is resting, it’s time to make the sauce that elevates this from a simple meal to a gourmet experience. This isn’t a heavy, gloopy alfredo; it is a refined, silky emulsion.
Ingredients:
- 2 tablespoons unsalted butter
- 3 cloves garlic, minced
- 1 shallot, finely diced
- 1/2 cup dry white wine (Pinot Grigio or Sauvignon Blanc)
- 1 cup heavy cream
- 1 cup freshly grated Parmigiano-Reggiano
- 1 teaspoon lemon zest
- 1 tablespoon fresh parsley, chopped
- A pinch of red pepper flakes (optional)
Instructions:
- Sauté: In a medium skillet over medium heat, melt the butter. Add the shallot and cook until translucent (about 2 minutes). Add the garlic and red pepper flakes, cooking for another 30 seconds until fragrant but not browned.
- Deglaze: Pour in the white wine. Use a wooden spoon to scrape up any “fond” (the brown bits) left from the aromatics. Let the wine reduce by half. This concentrates the acidity and removes the “boozy” bite.
- Simmer: Stir in the heavy cream. Bring to a gentle simmer (not a rolling boil). Let it cook for 3–5 minutes until it begins to slightly thicken.
- Emulsify: Turn the heat to low. Whisk in the Parmesan cheese one handful at a time. Whisking constantly is key here—you want the cheese to melt into the cream, not clump together.
- Finish: Stir in the lemon zest and parsley. The lemon zest is the “secret” ingredient; it cuts through the richness of the cream and cheese, brightening the entire dish. Taste and add salt only if needed (the Parmesan is naturally salty).
Part 5: Assembly for Maximum Impact
To serve this restaurant-style, you have two options for plating:
- The Napkins Method: Place a pool of the Parmesan sauce on the bottom of the plate. Slice the chicken cutlet into strips and fan them out over the sauce. This keeps the top of the chicken perfectly crispy while allowing the bottom to soak up the flavor.
- The Classic Drizzle: Place the whole cutlet on the plate and drizzle the sauce in a thick ribbon across the center, leaving the edges exposed to showcase the golden-brown crunch.
Top with an extra dusting of Parmesan and a sprig of fresh basil or parsley.
Perfect Side Dish Pairings
To make this a complete easy dinner tonight, you need sides that complement the richness of the Parmesan sauce without overwhelming it.
1. Garlicky Lemon Arugula Salad
The bitterness of arugula and the acidity of a lemon vinaigrette are the perfect foil for fried chicken and cream sauce. Simply toss baby arugula with olive oil, fresh lemon juice, shaved Parmesan, and toasted pine nuts.
2. Al Dente Linguine
If you want a heartier meal, toss linguine in a little bit of the extra Parmesan sauce. Add a splash of pasta water to the sauce to help it coat the noodles perfectly.
3. Roasted Asparagus or Broccolini
Trim the ends of the vegetables, toss with olive oil, salt, and pepper, and roast at 400°F for 12–15 minutes. The charred tips of the broccoli or asparagus add an earthy element to the plate.
The Science of Success: Troubleshooting Common Mistakes
Even seasoned cooks can hit a snag. Here is how to fix the most common issues with chicken cutlets:
- Breading is Falling Off: This usually happens because the chicken was too wet before the flour station. Ensure you pat the chicken dry with paper towels before starting the dredging process. Also, once breaded, let the chicken sit for 5 minutes before frying—this helps the coating “set.”
- The Crust is Burning but Meat is Raw: Your heat is too high. If the outside is browning too fast, turn the heat down and add a bit of room-temperature oil to the pan to lower the temperature quickly. You can also finish the chicken in a 350°F oven for 5 minutes.
- The Sauce is Grainy: This happens if the heat was too high when the cheese was added, or if you used pre-shredded cheese. Always add cheese on the lowest heat setting and whisk vigorously.
Storage and Reheating Tips
While fried chicken is best enjoyed immediately, you can preserve the quality of leftovers with the right technique.
- Storage: Keep the chicken and the sauce in separate airtight containers in the refrigerator for up to 3 days.
- Reheating the Chicken: NEVER use the microwave; it will turn the breading into a rubbery mess. Instead, place the cutlets on a baking sheet and heat in a 375°F oven or an air fryer for 5–7 minutes until the crust sizzles again.
- Reheating the Sauce: Cream sauces can “break” (separate into oil and solids) when reheated. To prevent this, put the sauce in a small saucepan over low heat and add a splash of milk or water. Whisk constantly as it warms up to bring the emulsion back together.
Why This Dish Works for a Busy Weeknight
You might look at the steps and think this is too much for a Tuesday night. However, this recipe is highly “prep-able.”
- Morning Prep: You can butterfly and pound the chicken in the morning and keep it in the fridge.
- The Breading Mix: You can mix the breadcrumbs and spices and store them in a jar weeks in advance.
- Speed: Once the prep is done, the actual cooking time for the chicken is less than 10 minutes, and the sauce takes about 8 minutes. You can have a world-class dinner on the table in under half an hour.
Final Culinary Thoughts
The Restaurant-Style Chicken Cutlet with Parmesan Crusted Sauce is more than just a recipe; it is a versatile technique that you can adapt to your own tastes. Want it spicy? Add cayenne to the breading. Want it more Mediterranean? Swap the parsley for oregano and add sun-dried tomatoes to the sauce.
The beauty of this dish lies in the contrast: the hot, crunchy shell giving way to the tender chicken, all smothered in a sauce that feels like a warm hug. It is comfort food elevated to an art form, yet accessible enough for any home kitchen.
Tonight, skip the reservation. Put on your favorite playlist, pour a glass of wine, and treat yourself to a dinner that tastes like it cost sixty dollars a plate—all from the comfort of your own home.
Quick Reference Summary Table
| Step | Key Focus | Pro Tip |
|---|---|---|
| Preparation | Uniformity | Pound chicken to 1/4 inch thickness for even cooking. |
| Dredging | Adhesion | Use the “Dry Hand/Wet Hand” method to stay clean. |
| Frying | Temperature | Maintain 350°F; use a wire rack for cooling to keep it crispy. |
| The Sauce | Emulsion | Whisk freshly grated Parmigiano-Reggiano into low-heat cream. |
| Plating | Texture | Sauce the bottom of the plate to preserve the top crunch. |
Suggested Wine Pairings
- White: A buttery Chardonnay or a crisp Vermentino. The acidity cuts the fat, while the body matches the cream sauce.
- Red: If you prefer red, go with a light-bodied Pinot Noir or a Gamay. Avoid heavy tannins, as they can clash with the delicate cream sauce.
Enjoy your masterpiece. This is how you master the art of the easy, elegant dinner.