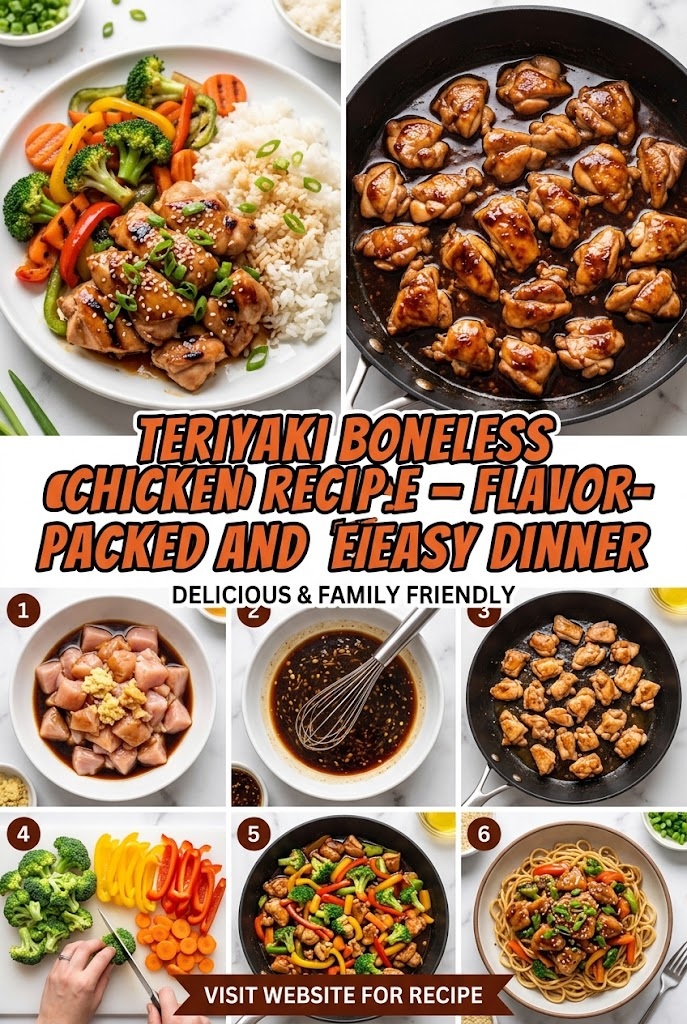
Teriyaki Boneless Chicken Recipe – Flavor-Packed and Easy Dinner
There is a specific kind of magic that happens when the salty depth of soy sauce meets the caramelized sweetness of brown sugar and the sharp zing of fresh ginger. This synergy is the hallmark of Teriyaki—a culinary technique that has transcended its Japanese origins to become a global symbol of comfort, efficiency, and sheer deliciousness. When you apply this technique to succulent boneless chicken, you create a dish that is not just a meal, but an experience.
Whether you are a busy parent looking for a twenty-minute win or a food enthusiast seeking to master the art of the perfect glaze, this comprehensive guide to Teriyaki Boneless Chicken will transform your kitchen into the best neighborhood bistro.
The Soul of Teriyaki: Understanding the Method
To cook great Teriyaki, one must first understand what the word actually means. In Japanese, “Teri” (照り) refers to the luster or gleam provided by the sugar content in the sauce, while “Yaki” (焼き) refers to the method of cooking—specifically grilling or broiling.
Authentic Teriyaki is characterized by a thin, intense glaze that coats the meat like a shimmering lacquer. In the Western adaptation, we often prefer a slightly thicker, saucier version that can be drizzled over rice. This recipe bridges that gap, offering the authentic depth of flavor with the satisfying consistency that makes it a family favorite in households across the United States.
Why Boneless Chicken is the Superior Choice
While bone-in chicken has its merits, the “boneless” aspect is the secret to the weeknight success of this dish.
- Fast and Even Cooking: Without bones to act as heat insulators, boneless cuts cook rapidly and uniformly.
- Surface Area: Cubing or slicing boneless chicken creates more surface area, allowing every single piece of meat to be hugged by the sauce.
- Ease of Consumption: Especially for families with children, boneless chicken makes for a seamless dining experience.
- Versatility: You can choose between the lean, high-protein profile of chicken breasts or the rich, juicy tenderness of chicken thighs.
The Anatomy of the Perfect Homemade Teriyaki Sauce
Forget the bottled stuff. Most store-bought Teriyaki sauces are loaded with high-fructose corn syrup, artificial thickeners, and excessive sodium. Making your own takes five minutes and results in a flavor profile that is infinitely more complex.
The Essential “Big Four” Ingredients
- Soy Sauce: The foundation. For the best results, use a naturally brewed soy sauce. If you are watching your sodium intake, “less sodium” soy sauce works perfectly. For a gluten-free version, Tamari is an excellent 1:1 substitute.
- Mirin: This is a Japanese sweet rice wine. It provides the signature “Teri” (luster) and a mild acidity that cuts through the salt.
- Sake or Rice Vinegar: Sake adds a sophisticated depth, but if you prefer to cook without alcohol, rice vinegar provides the necessary tang to balance the sugars.
- Sweetener: Traditionally, white sugar is used, but brown sugar adds a hint of molasses that pairs beautifully with chicken. Honey or maple syrup can also be used for a more floral sweetness.
The Aromatics (The Flavor Elevators)
- Fresh Ginger: Never use powder if you can avoid it. Freshly grated ginger provides a spicy, refreshing heat that is quintessential to the dish.
- Fresh Garlic: Minced finely, garlic adds a savory backbone that makes the sauce addictive.
- Toasted Sesame Oil: Just a teaspoon added at the end provides a nutty aroma that rounds out the entire flavor profile.
Step-by-Step Guide: The Master Recipe
This recipe is designed to be foolproof, yielding tender chicken and a glossy, thick sauce every single time.
Ingredients List
For the Chicken:
- 1.5 lbs Boneless, Skinless Chicken Thighs (recommended) or Breasts, cut into 1-inch bite-sized pieces.
- 1 tablespoon Neutral Oil (Avocado, Grapeseed, or Vegetable oil).
- Salt and Pepper (sparingly, as the soy sauce is salty).
- 1 tablespoon Cornstarch (optional, for “velveting” the chicken).
For the Ultimate Teriyaki Sauce:
- 1/2 cup Soy Sauce.
- 1/4 cup Water.
- 1/4 cup Brown Sugar (packed).
- 1 tablespoon Mirin.
- 1 tablespoon Rice Vinegar.
- 2 cloves Garlic, minced.
- 1 teaspoon Fresh Ginger, grated.
- 1 teaspoon Toasted Sesame Oil.
- Slurry: 1 tablespoon Cornstarch mixed with 1 tablespoon cold water.
For Garnish:
- Toasted Sesame Seeds.
- Thinly sliced Green Onions (scallions).
The Preparation Phase
1. Prep the Chicken: Pat the chicken dry with paper towels. This is a crucial step; moisture on the surface of the meat prevents browning. If you want ultra-tender chicken (similar to Chinese takeout style), toss the raw pieces in a bowl with 1 tablespoon of cornstarch until lightly coated. This creates a protective barrier and helps the sauce cling to the meat later.
2. Whisk the Sauce: In a medium bowl, combine the soy sauce, water, brown sugar, mirin, rice vinegar, garlic, and ginger. Whisk until the sugar is mostly dissolved. Do not add the cornstarch slurry yet; that comes at the end.
The Cooking Process
Step 1: The Sear Heat your oil in a large skillet or wok over medium-high heat. Once the oil is shimmering (but not smoking), add the chicken in a single layer. Do not overcrowd the pan; if necessary, cook in two batches. Let the chicken sit undisturbed for 2-3 minutes to develop a golden-brown crust. Flip and cook for another 2 minutes. The chicken doesn’t need to be fully cooked through at this stage.
Step 2: The Infusion Pour the prepared Teriyaki sauce over the chicken in the skillet. Bring the mixture to a gentle boil. As the sauce bubbles, it will begin to infuse the chicken with flavor and cook it through. Reduce the heat to medium-low and simmer for about 5 minutes.
Step 3: The Glaze (The Magic Moment) Give your cornstarch slurry a quick stir (cornstarch settles at the bottom) and pour it into the simmering pan. Stir constantly. Within 30 to 60 seconds, you will see the sauce transform from a thin liquid into a thick, translucent, and glossy glaze.
Step 4: The Finish Remove the pan from the heat. Stir in the toasted sesame oil. This preserves the oil’s delicate aroma which can be lost under high heat.
Pro Tips for Success: Avoiding Common Mistakes
Don’t Burn the Sugar
Because Teriyaki sauce has a high sugar content, it can go from “caramelized” to “burnt” very quickly. Once you add the sauce to the pan, keep a close eye on the temperature. If it starts to smell like burnt marshmallows, immediately add a splash of water and turn down the heat.
Achieve the “Velvet” Texture
The secret of high-end Asian restaurants is “velveting.” By coating the chicken in a bit of cornstarch or egg white before searing, you create a texture that is incredibly soft on the inside and slightly crisp on the outside. It also acts as a natural thickener for the sauce.
Use Fresh Aromatics
The difference between “good” Teriyaki and “world-class” Teriyaki lies in the ginger and garlic. Grating the ginger directly into the bowl allows the juices to become part of the sauce, providing a much deeper flavor than pre-minced jars or dried spices.
Healthier Variations and Dietary Adjustments
One of the best things about making Teriyaki Boneless Chicken at home is that you are in total control of the ingredients.
Low-Sodium Version
Use a “Low Sodium” or “Lite” soy sauce. You can also replace half of the soy sauce with chicken bone broth to maintain the volume of the sauce while significantly cutting the salt.
Gluten-Free Teriyaki
Standard soy sauce contains wheat. To make this dish gluten-free, simply swap the soy sauce for Tamari or Coconut Aminos. If using Coconut Aminos, reduce the amount of sugar in the recipe, as aminos are naturally sweeter.
Refined Sugar-Free
For those avoiding processed sugar, replace the brown sugar with:
- Honey: Adds a beautiful floral note.
- Maple Syrup: Gives a deep, earthy sweetness.
- Pineapple Juice: This is a classic Hawaiian-style variation. Use 1/4 cup of pineapple juice and reduce the sugar to just one tablespoon. The bromelain in the pineapple juice also acts as a natural meat tenderizer.
Keto/Low-Carb Options
To make this Keto-friendly:
- Replace sugar with a brown sugar substitute like Swerve or Monk Fruit.
- Instead of cornstarch for the slurry, use a tiny pinch of Xanthan Gum (be careful, a little goes a long way) or simply simmer the sauce longer to reduce it naturally.
Advanced Techniques: Beyond the Skillet
While the stovetop method is the fastest, there are other ways to prepare Teriyaki Boneless Chicken depending on your equipment and schedule.
The Sheet Pan Method (The “Set It and Forget It” Way)
If you want to cook for a crowd without standing over a stove, the sheet pan is your best friend.
- Toss the chicken and some sturdy vegetables (like broccoli or bell peppers) in half of the Teriyaki sauce.
- Spread them out on a parchment-lined baking sheet.
- Bake at 400°F (200°C) for 15-20 minutes.
- Boil the remaining sauce in a small saucepan on the stove to thicken it, then drizzle it over the baked chicken.
The Air Fryer Method (Maximum Crunch)
For those who love a bit of texture:
- Marinate the chicken pieces for 30 minutes.
- Drain the marinade (keep it!) and air fry the chicken at 380°F for 12-15 minutes, shaking the basket halfway through.
- While the chicken fries, simmer the marinade in a pan until thick.
- Toss the crispy chicken in the thickened sauce right before serving.
The Slow Cooker Method (The Ultra-Tender Way)
Perfect for using chicken breasts that might otherwise dry out:
- Place chicken in the slow cooker.
- Pour the sauce (minus the slurry) over it.
- Cook on Low for 3-4 hours.
- Remove the chicken, whisk the slurry into the liquid in the pot, and turn to High for 15 minutes until the sauce thickens. Shred or cube the chicken and return it to the pot.
Perfect Pairings: What to Serve with Teriyaki Chicken
A great main dish deserves equally impressive sides. The goal is to provide balance—something to soak up the sauce and something fresh to cut through the richness.
The Base
- Steamed Jasmine Rice: The floral aroma and fluffy texture make it the traditional favorite.
- Brown Rice: For a nuttier flavor and more fiber.
- Quinoa: A protein-packed modern twist.
- Cauliflower Rice: The best low-carb vessel for the sauce.
The Greenery
- Garlic Sautéed Bok Choy: The crunch of the stems and the softness of the leaves are a perfect textural match.
- Steamed Broccoli: The florets act like little sponges, soaking up the extra Teriyaki glaze.
- Smashed Cucumber Salad: A cold, vinegary cucumber salad provides a refreshing contrast to the warm, sweet chicken.
- Stir-fried Snap Peas: For a burst of sweetness and “snap.”
Meal Prep and Storage: The Gift That Keeps on Giving
Teriyaki Boneless Chicken is one of those rare dishes that actually tastes better the next day as the flavors continue to meld.
Storing in the Fridge
Store leftovers in an airtight container for up to 4 days. The sauce may thicken further when cold, becoming almost jelly-like due to the gelatin in the chicken and the cornstarch.
Reheating Tips
- Microwave: Add a teaspoon of water before reheating to loosen the sauce. Heat in 30-second intervals, stirring in between.
- Stovetop: Reheat in a small skillet over low heat with a splash of water or chicken broth to bring the glaze back to life.
Freezing for Later
You can freeze the cooked chicken in its sauce for up to 3 months. This makes it an ideal “emergency meal.” Thaw overnight in the refrigerator before reheating.
Alternatively, you can create “Teriyaki Freezer Bags.” Place raw chicken and the sauce (without the slurry) in a freezer bag. When you’re ready to cook, thaw the bag and dump the contents into a slow cooker or skillet.
The History and Evolution of Teriyaki
To truly appreciate Teriyaki, it’s fascinating to look at its journey. While the techniques of “Teri” and “Yaki” are centuries old in Japan, the Teriyaki sauce we know today—thick, sweet, and heavy on the garlic and ginger—actually has strong roots in Hawaii.
In the 1960s, Japanese immigrants in Hawaii adapted the traditional recipe using local ingredients like pineapple juice and more abundant sugar sources. This “Hawaiian Teriyaki” migrated to the mainland US, particularly the Pacific Northwest, where “Teriyaki Shops” became as ubiquitous as pizzerias. Seattle, in particular, is considered the Teriyaki capital of the United States, where the dish is almost always served with a specific style of char-grilled chicken and a side of macaroni salad.
Understanding this evolution helps us realize that Teriyaki isn’t a rigid set of rules, but a living culinary tradition that encourages customization.
Frequently Asked Questions (FAQ)
Can I use frozen chicken?
Yes, but you must thaw it completely first. If you cook chicken from frozen, it will release too much water, which will dilute your sauce and prevent the meat from searing properly.
How do I make the sauce thicker without cornstarch?
You can reduce the sauce by simmering it for a longer period (10-15 minutes) until the water evaporates and the sugars concentrate. Alternatively, you can use a small amount of arrowroot powder or a “beurre manié” (equal parts butter and flour mashed together).
Why is my chicken tough?
This usually happens with chicken breasts if they are overcooked. Chicken breasts should reach an internal temperature of 165°F. If you find your chicken is consistently tough, try switching to boneless chicken thighs. Thighs have more fat and connective tissue, making them much more forgiving and difficult to overcook.
Is Teriyaki chicken healthy?
When made at home, yes! It is a high-protein dish. By controlling the sugar and using plenty of ginger and garlic, you get a nutrient-dense meal. To make it even healthier, serve it with double the vegetables and a smaller portion of grain.
The Ultimate Flavor Upgrades: Taking it to the Next Level
Once you have mastered the basic recipe, you can start experimenting with these “chef-level” additions:
- The Pineapple Punch: Add 1/2 cup of canned pineapple chunks to the pan during the simmering stage. The heat caramelizes the pineapple, making it a sweet and tangy explosion.
- The Spicy Kick: Add a teaspoon of Sriracha, Chili Garlic Sauce, or dried red chili flakes to the sauce mixture for a “Spicy Teriyaki” version.
- The Zesty Twist: Grate a bit of orange or lime zest into the sauce at the very end. The citrus oils provide a bright, high note that cuts through the umami.
- The Smokey Finish: If you don’t have an outdoor grill, add a single drop of “Liquid Smoke” to the sauce to mimic the flavor of charcoal grilling.
Conclusion: Your New Weeknight Staple
The Teriyaki Boneless Chicken Recipe is more than just a set of instructions; it is a blueprint for culinary success. It proves that you don’t need a pantry full of exotic ingredients or hours of free time to produce a meal that looks and tastes like it came from a professional kitchen.
The beauty of this dish lies in its balance. It is salty yet sweet, simple yet sophisticated, and familiar yet exciting. By mastering the sear, perfecting the glaze, and choosing high-quality aromatics, you are not just making dinner—you are mastering a technique that will serve you for a lifetime.
So, the next time you find yourself reaching for a takeout menu or a pre-made bottle of sauce, stop. Grab some soy sauce, ginger, and garlic. In less time than it takes for a delivery driver to arrive, you’ll be sitting down to a plate of shimmering, flavor-packed Teriyaki chicken that is guaranteed to be the highlight of your week.
Summary Checklist for the Perfect Teriyaki:
- Dry the chicken before searing for maximum browning.
- Use fresh ginger and garlic for the best aroma.
- Thighs are more forgiving than breasts for beginners.
- Don’t skip the slurry if you want that iconic thick glaze.
- Add sesame oil last to keep its flavor vibrant.
Enjoy the process, experiment with the ratios, and most importantly, enjoy every delicious, glaze-covered bite!